


“Soft Kitty” Chocolate Mayo Sheet Cake
*This post was created in collaboration with Warner Bros. for Young Sheldon. All words, images, and opinions are my own.
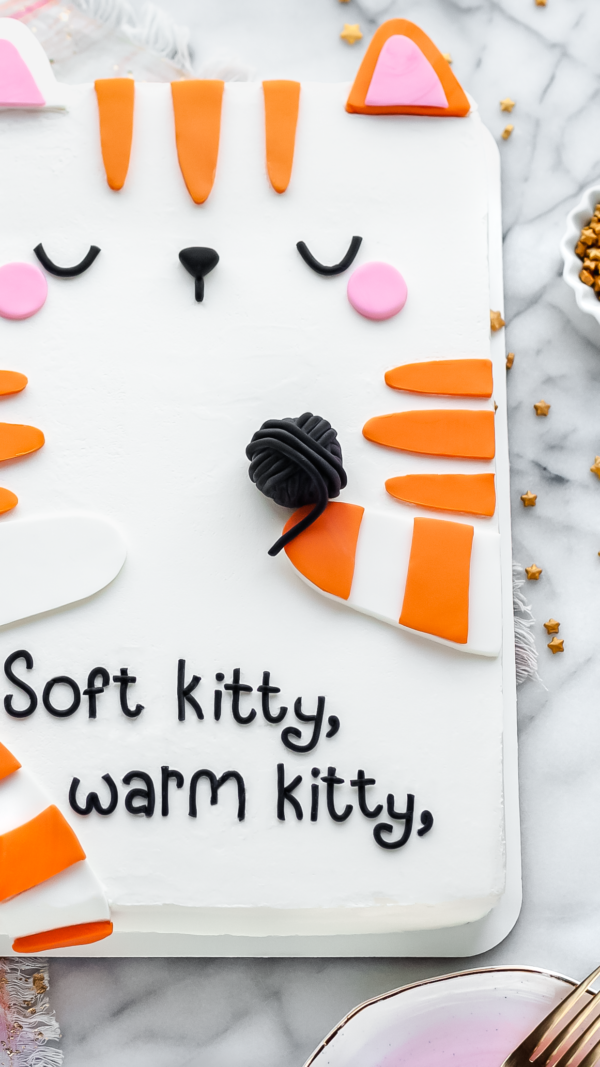
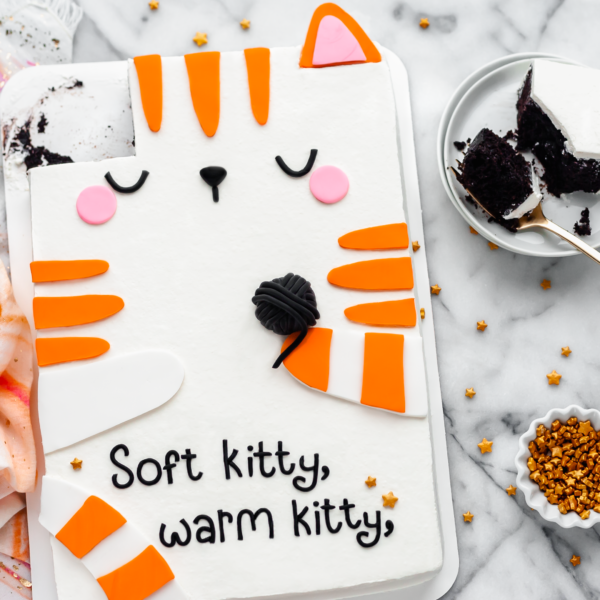
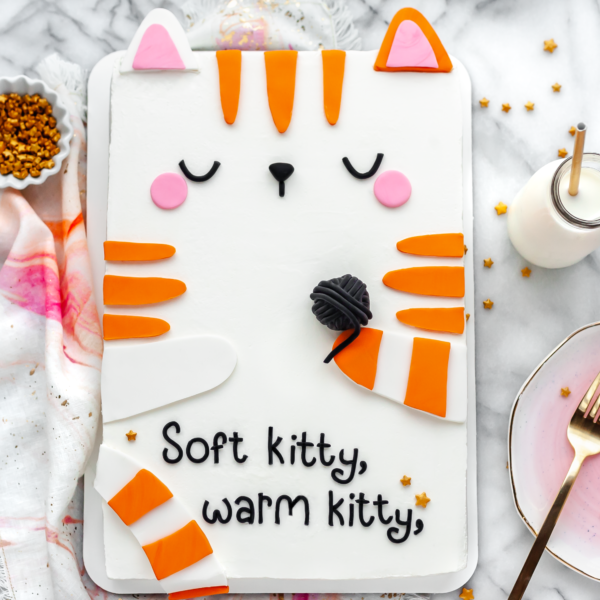
If you’ve watched The Big Bang Theory you might immediately recognize those lyrics on my cake as the “Soft Kitty” song that Penny sings to Sheldon when he’s feeling homesick. That particular episode has always been one of my favorites – it shows this sweet vulnerability in Sheldon that he often hides. It’s also the inspiration for this cute cake that I made with Warner Bros. for their The Big Bang Theory spin-off, Young Sheldon, which is now airing 5x a week – at 6:30pm EST on WSYX-FOX 28 here in Columbus, OH. Check your local listings here. Sheldon Cooper has always been my favorite character on TBBT, and I’ve loved watching Young Sheldon to learn more about his childhood and interactions with his family – along with the origins of “Soft Kitty” :).
This cake recipe was adapted from one in my Grandma Bea’s book. The classic chocolate mayo cake- it’s quite simple to make with chocolate cake mix, and I modified it slightly here just to add more structure for decorating as well as to give it even more chocolate flavor. Fluffy, moist and def not what you would expect from a boxed cake mix! I highly recommend a dark chocolate mix, but feel free to use your favorite. To save time, you can also customize the frosting, use store-bought or give my SMBC a go for a SUPER smooth and silky finish. The adorable cat and lyrics were all easily made with pre colored fondant, so you don’t have to worry about handwriting (trust me, mine is terrible lol)! Perfect to bake up with your own family, and then you an enjoy a slice (or two) while catching up on Young Sheldon.
Ingredients: (makes 1 9×13″ cake, about 15 servings)
Chocolate Mayo Sheet Cake:
Vanilla Swiss Meringue Buttercream (SMBC):
Cat Decorations:
Orange, black, and white fondant
Pink gel food coloring
Small round fondant or cookie cutters
X-ACTO or sharp kitchen knife
Fondant or clay extruder
Helpful Tips:
To bring all the chilled ingredients to room temperature, remove them from the refrigerator about 45 minutes before you begin.
I like to bake the cake the night before decorating so it has plenty of time to cool and firm up a bit in the freezer. To save time, I also often make the buttercream in advance as well. SMBC can be kept at room temperature for about 2 days (just re-whip with a spatula before you use it). You can also make the fondant decorations in advance. Larger pieces, like the ears, hold up a bit better when they’ve had some time to dry and aren’t as sticky/malleable.
To save time and any hassle of leveling the cake, I like to bake mine up nice and flat. Bake even strips help a lot with this and they also help the cake to retain moisture (so the edges won’t overcook or brown before the middle is set). Just soak the strips in warm water while preparing the cake batter.
Directions:
- Preheat the oven to 325°F. Grease a 9×13″ pan, line the bottom with parchment paper, grease again, and flour the entire pan. Set aside.
- Sift the cake mix, cocoa powder, flour, cinnamon, salt and sugar into a medium mixing bowl. Use a whisk or the paddle attachment, on your mixer, to stir the dry ingredients together.
- Add the mayo, milk, eggs, and vanilla and beat on medium speed for 2 minutes. Pour into your prepared baking pan, add the bake even strips (if using) and bake for 50-60 minutes, or until a knife inserted in the center comes out clean.
- Transfer the baking pan to a wire cooling rack to cool completely.
- Once cooled, invert the pan (you may have to carefully run an offset spatula between the cake and the pan to release) and allow the cake to cool completely. Then wrap it in a double layer of plastic wrap and transfer to the freezer overnight. I find it easiest to use cake boards to both invert the cake and to move it in and out of the freezer. This is a softer cake, so you want to be careful not to break it apart when moving.
- The Swiss Meringue Buttercream can be made in advance. You’ll just want to rewhip it the day you are frosting and assembling your cake. To begin, you want to make sure your mixing bowl, whisk and paddle attachments, and all tools are 100% free from any grease or the egg whites won’t properly set up. I like to rinse them with a little white vinegar mixed with cold water.
- Crack the eggs, one by one, in a small bowl, adding the egg whites to a large mixing bowl (this prevents any yolks from contaminating all the eggs at once). Whisk in the sugar and salt.
- Set the bowl over a saucepan filled with about 1 ½ -2 inches simmering water and whisk constantly. Make sure the bowl of egg whites is resting above the water and not touching it. Continue to whisk until the mixture begins to thin out and become a bit frothy looking. Carefully dip a clean finger into the egg white mixture and rub 2 of your fingers together to see if you can feel any sugar granules. Once the mixture is completely smooth and warm to the touch it is ready. You can also use an instant read thermometer to check when the mixture comes to 160°F.
- Carefully pour the warm egg white mixture into the bowl of your stand mixer, fitted with the whisk attachment, and beat on medium-high for 15-18 minutes, or until stiff peaks form and the outside of the bowl is cool to the touch. If stiff peaks form but the bowl is still warm pop it in the fridge for about 10 minutes before continuing onto the next step.
- Replace the whisk attachment with the paddle attachment, and with the mixer on medium speed, very slowly add the butter 1 tablespoon at a time, allowing each to become fully incorporated before adding more.
- Once all the butter has been added, add the vanilla, and increase the speed to medium-high whipping again for 1 minute.
- Now that everything is made, we can assemble the cake! Remove the frozen cake layer about 30 minutes before decorating. Then spread a little of the frosting onto your cake board and carefully place your cake on top – with the bottom of the cake facing up.
- Crumb coat using the SMBC and an offset spatula to transfer frosting to the sides and top of the cake and roughly smooth the frosting. I also like to use a bench scraper for this process. Transfer the cake to the refrigerator for 30 minutes.
- Once chilled, repeat the process of adding buttercream to the cake, and use the spatula and a bench scraper to smooth as much as possible. Transfer back to the refrigerator for at least 1-2 hours to set up firm.
- Next, we will do a cold scrape which allows us to get razor sharp edges. This works because we used a meringue-based buttercream. Make sure the frosting is firm and then use your same spatula tools to gently scrape any excess frosting away and smooth.
- Use the pink gel coloring to color a small portion of the white fondant. Roll each color of fondant out to about 1/8″ thick (or slightly thicker). Use an X-ACTO or sharp kitchen knife to cut the triangles for the ears, the paws, tail, and stripes. Then, use a 1″ round cookie cutter to press the cheeks out of the pink fondant. You can use a little water to get the fondant to stick together (to add stripes and the middle of the ears).
- Add a small amount of the black fondant, at a time, to a fondant/clay extruder and place a small round disk on the front. Crank the extruder to create ropes of the fondant. Then, cut the ropes and bend to form the sleepy eyes, a tiny piece for the mouth and about 15 ropes to create the yarn ball. Roll a little ball of the black fondant to form the nose.
- To make the yarn. Start with a 1-2″ ball of black fondant, then begin to twist the ropes around the ball, using water to adhere. Keep going in about 3 different directions, with 5-6 strands per side.
- Carefully transfer all of your decorations to the top of the cake. The ears may not want to hold if you didn’t let them dry first, so you can either move them lower so that they rest on the cake more, or stiffen the back of them using melted white chocolate (spread it over the back of each ear and allow it to set before handling).
- To create the “Soft Kitty” lyrics, make more fondant ropes and use your sharp knife to help cut pieces of the rope to form into the letters. I used a toothpick to help curve the ends of the letters (tweezers help to transfer the tiny pieces to the cake without smashing the frosting).
- Admire your pawsome creation and enjoy!
Leftover cake will keep for a few days at room temp (covered loosely), or tightly covered and refrigerated for longer. You can also cover and freeze extra cake (freezing helps keep the cake from drying out as well). Please let me know if you try this tutorial, I would love to see your version :).


join the mailing list!
get recipes and other delicious tidbits sent to your inbox!


